
What is Snowflake? A Complete Guide to Storing and Managing Files in Snowflake
In today’s digital world, organizations generate massive amounts of data from websites, applications, business transactions, IoT devices, and enterprise systems. Managing this information efficiently requires modern cloud-based data platforms.
Traditional databases primarily focus on storing structured information in tables. However, modern data engineering involves working with multiple file formats, including CSV, JSON, XML, Parquet, PDF, images, and other unstructured files.
Snowflake is one of the popular cloud data platforms that helps organizations store, process, transform, and analyze data efficiently.
But have you ever wondered how to upload files into Snowflake? Can we store CSV files, JSON files, and other documents? What is the difference between internal and external stages?
In this tutorial, we will explore Snowflake architecture, file storage concepts, internal stages, external stages, and practical SQL commands to upload and manage files.
1. Snowflake Explained: Understanding the Cloud Data Platform
Snowflake is a cloud-based data platform designed for data warehousing, data engineering, analytics, and secure data sharing.
It operates on major cloud infrastructure providers:
- Amazon Web Services (AWS)
- Microsoft Azure
- Google Cloud Platform (GCP)
One of Snowflake’s important architectural features is the separation of storage and compute resources.
This means organizations can store large amounts of data while independently scaling computing resources according to their processing requirements.
Major Capabilities of Snowflake
Cloud-Native Storage: Store large volumes of enterprise data using cloud infrastructure.
Independent Compute Scaling: Increase or decrease virtual warehouse resources based on workload requirements.
Multiple Data Formats: Work with structured, semi-structured, and unstructured data.
Secure Data Sharing: Share data with other organizations and Snowflake accounts.
Data Integration: Connect with external applications, cloud storage, and data engineering tools.
Performance Optimization: Use features such as micro-partitions, caching, and query optimization.
2. Inside Snowflake Storage: How Does File Management Work?
Snowflake provides different mechanisms for managing data files.
One important concept is called a Stage.
A stage is a location where data files are stored or referenced before they are loaded into Snowflake tables or processed.
For example, imagine an organization receives customer transaction files every day.
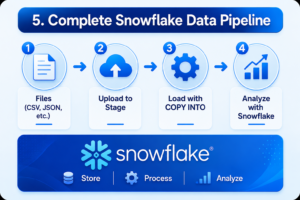
The data engineering team follows this process:
- Receive CSV files from the source application.
- Upload files into a Snowflake internal stage or make them available in external cloud storage.
- Validate the uploaded files.
- Load the required data into Snowflake tables.
- Transform the data using SQL.
- Make the processed information available for reporting.
Understanding the Two Main Stage Categories
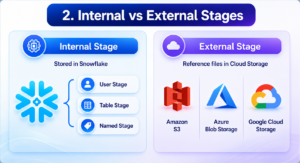
Internal Stage
An internal stage stores files in Snowflake-managed storage.
Snowflake provides three types:
- User Stage
- Table Stage
- Named Internal Stage
External Stage
An external stage references files stored outside Snowflake.
Common cloud storage services include:
- Amazon S3
- Azure Blob Storage
- Google Cloud Storage
External stages allow Snowflake to access files without requiring them to be uploaded into Snowflake-managed internal storage.
3. Build Your First Snowflake Database Environment
Let’s begin our practical implementation.
First, log in to your Snowflake account and open a SQL Worksheet.
Create a database:
CREATE DATABASE SQLSCHOOL_DB;Select the database:
USE DATABASE SQLSCHOOL_DB;Create a schema:
CREATE SCHEMA SALES_SCHEMA;Select the schema:
USE SCHEMA SALES_SCHEMA;We have successfully created our database environment.
4. Create a Named Internal Stage for File Storage
Now let’s create an internal stage to store files uploaded from a local computer.
Execute the following SQL command:
CREATE OR REPLACE STAGE SALES_STAGE;To display the available stages:
SHOW STAGES;To check the files inside the stage:
LIST @SALES_STAGE;Initially, the stage will be empty because we have not uploaded any files.
5. Transfer Local CSV Files into Snowflake Using PUT
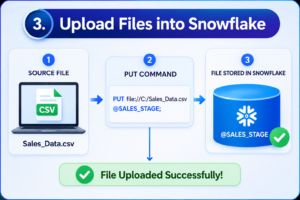
Now let’s understand how to upload a CSV file from your local computer.
Assume that we have a file named:
Sales_Data.csv
File location:
C:\SQLSchool\Sales_Data.csv
We can upload this file into the internal stage using the PUT command.
PUT file://C:/SQLSchool/Sales_Data.csv
@SALES_STAGE
AUTO_COMPRESS=TRUE;
Important Information About PUT
The PUT command uploads files from a local file system into an internal stage.
It is supported through Snowflake clients such as SnowSQL and compatible drivers. It is not executed as an ordinary SQL command in the standard Snowflake web worksheet.
After uploading the file, verify it:
LIST @SALES_STAGE;You should now see the uploaded file and its associated information.
6. Define a CSV File Format for Accurate Data Ingestion
Before loading the CSV file into a Snowflake table, we need to define how Snowflake should interpret the file.
Create a CSV file format:
CREATE OR REPLACE FILE FORMAT SALES_CSV_FORMAT
TYPE = CSV
FIELD_DELIMITER = ','
SKIP_HEADER = 1
FIELD_OPTIONALLY_ENCLOSED_BY = '"'
NULL_IF = ('NULL', 'null');
What Do These File Format Properties Mean?
- TYPE = CSV: Identifies the source file as CSV.
- FIELD_DELIMITER: Specifies the column separator.
- SKIP_HEADER = 1: Skips the first header row.
- FIELD_OPTIONALLY_ENCLOSED_BY: Handles values enclosed in quotation marks.
- NULL_IF: Specifies values to interpret as NULL.
Creating a reusable file format helps maintain consistency when processing multiple files.
7. Design a Target Table for Incoming Sales Records
Now we need a destination table to store the CSV information.
Create a table:
CREATE OR REPLACE TABLE SALES_DATA
(
    SALE_ID INT,
    CUSTOMER_NAME VARCHAR(100),
    PRODUCT_NAME VARCHAR(100),
    AMOUNT NUMBER(10,2),
    SALE_DATE DATE
);
Our target table contains five columns:
| Column | Data Type |
|---|---|
| SALE_ID | INT |
| CUSTOMER_NAME | VARCHAR |
| PRODUCT_NAME | VARCHAR |
| AMOUNT | NUMBER |
| SALE_DATE | DATE |
Make sure that the CSV file contains compatible column values.
8. Move Staged CSV Records into Snowflake Using COPY INTO
Now comes the most important step.
We have uploaded the file into our stage and created the target table.
Let’s load the data using COPY INTO.
COPY INTO SALES_DATA
FROM @SALES_STAGE
FILE_FORMAT = (FORMAT_NAME = 'SALES_CSV_FORMAT');
Snowflake reads the staged file and loads the records into the target table.
Important: The CSV column order and data types should match the target table when using this command without a transformation SELECT statement.
9. Validate File Loading Results and Confirm Successful Ingestion
After executing COPY INTO, verify the loaded records.
SELECT *
FROM SALES_DATA;
Check the total number of records:
SELECT COUNT(*)
FROM SALES_DATA;
You can also inspect the loading history:
SELECT *
FROM TABLE(
    INFORMATION_SCHEMA.COPY_HISTORY(
        TABLE_NAME => 'SALES_DATA',
        START_TIME => DATEADD('DAY', -1, CURRENT_TIMESTAMP())
    )
);
This helps identify file loading details and investigate ingestion issues.
Congratulations! You have successfully uploaded a CSV file into Snowflake and loaded its records into a database table.
10. Connect Cloud Storage to Snowflake Using External Stages
So far, we have used an internal stage.
But in real-time enterprise environments, organizations often maintain files in external cloud storage platforms.
For example:
- Amazon S3
- Azure Blob Storage
- Google Cloud Storage
Snowflake supports external stages to reference these files.
Practical Example: Access Sales Files from Amazon S3
Assume that an organization stores sales files in the following S3 location:
s3://your-bucket-name/sales/
First, an administrator must configure the appropriate storage integration and cloud permissions.
Then create an external stage:
CREATE OR REPLACE STAGE S3_SALES_STAGE
URL = 's3://your-bucket-name/sales/'
STORAGE_INTEGRATION = SALES_S3_INTEGRATION
FILE_FORMAT = SALES_CSV_FORMAT;
To view available files:
LIST @S3_SALES_STAGE;Snowflake can now access files from the configured S3 location.
Unlike an internal stage, an external stage does not upload local files using the PUT command. Files are placed in the cloud storage location using the cloud provider’s tools or applications.
11. Compare Internal and External Storage Approaches
Understanding the differences between internal and external stages is important for designing data engineering solutions.
| Feature | Internal Stage | External Stage |
|---|---|---|
| Storage | Snowflake-managed | External cloud storage |
| File location | Within Snowflake-managed storage | AWS, Azure, or GCP |
| PUT command | Supported for local uploads | Not used for uploading |
| File management | Snowflake | Cloud storage provider |
| Common usage | Direct file ingestion | Enterprise cloud pipelines |
Which one should you choose?
Use internal stages when you want to upload local files directly into Snowflake.
Use external stages when your organization already maintains files in cloud storage and needs Snowflake to access them.
12. Explore Different File Formats Supported by Snowflake
Snowflake supports working with different categories of data.
Structured Data
Structured data follows a predefined tabular format.
Examples:
- CSV
- Tabular datasets
Semi-Structured Data
Semi-structured data has a flexible structure.
Examples:
- JSON
- XML
- Parquet
- Avro
- ORC
Snowflake provides the VARIANT data type to store and query many types of semi-structured data.
Unstructured Data
Unstructured files do not follow a predefined tabular schema.
Examples:
- PDF documents
- Images
- Audio files
- Video files
- Text documents
These files can be staged and accessed through supported Snowflake file-handling capabilities.
Snowflake also provides the FILE data type to represent references to staged files and their associated metadata.
13. Real-Time Project Example: Retail Sales File Processing Pipeline
Let’s understand how a real organization uses Snowflake for file storage and data processing.
Imagine a retail company operating 50 stores across different locations.
Every day, each store generates sales information in CSV format.
The data engineering team needs to consolidate all the files into one centralized cloud data platform.
Business Implementation Workflow
Step 1: Data Collection
Collect daily sales files from different store locations.
Step 2: Cloud File Storage
Upload the files into Amazon S3 or a Snowflake internal stage.
Step 3: File Validation
Validate file names, formats, and data quality.
Step 4: Data Ingestion
Use COPY INTO to load the records into Snowflake tables.
Step 5: Data Transformation
Use SQL to clean customer details, calculate sales amounts, and remove duplicate records.
Step 6: Business Reporting
Connect Snowflake with Power BI to create sales dashboards.
Expected Business Benefits
- Centralized data management.
- Faster data ingestion.
- Scalable cloud storage.
- Improved reporting capabilities.
- Better business decision-making.
This is a practical example of how Snowflake is used in modern data engineering projects.
14. Essential Snowflake File Management Commands Every Data Engineer Should Know
| Command | Description |
|---|---|
| CREATE STAGE | Creates a stage |
| SHOW STAGES | Displays available stages |
| LIST | Lists files in a stage |
| PUT | Uploads local files to internal stages |
| GET | Downloads files from internal stages |
| COPY INTO | Loads or unloads data |
| REMOVE | Removes files from a stage |
| CREATE FILE FORMAT | Defines file processing rules |
Understanding these commands will help you work with real-time Snowflake data ingestion scenarios.
15. Frequently Asked Questions About Snowflake File Storage
1. What is Snowflake mainly used for?
Snowflake is used for cloud data warehousing, data engineering, analytics, data integration, and secure data sharing.
2. Can we upload files directly into Snowflake?
Yes. You can upload files into Snowflake internal stages using supported clients or use the Snowflake web interface’s file-loading capabilities where applicable.
3. What is an internal stage in Snowflake?
An internal stage is a Snowflake-managed storage location used to hold files before loading or processing them.
4. What is an external stage?
An external stage references files stored in external cloud storage platforms such as AWS S3, Azure Blob Storage, or Google Cloud Storage.
5. What is the purpose of the PUT command?
PUT transfers local files into an internal Snowflake stage.
Conclusion: Take Your First Step Towards Snowflake Data Engineering
Snowflake has become an important platform in the modern data engineering ecosystem.
Understanding file storage, internal stages, external stages, file formats, PUT, and COPY INTO commands is essential for building practical data ingestion pipelines.
In this tutorial, we explored how to create a Snowflake database, configure stages, upload CSV files, define file formats, load records into tables, and access files from external cloud storage.
The next step is to practise these concepts with real-time datasets and enterprise-level projects.
Learn Practical Snowflake Data Engineering at SQL School
Want to develop your skills in Snowflake and modern data engineering?
SQL School Training Institute provides practical, interactive IT training designed to help learners develop industry-relevant technical skills.
Why Choose SQL School Training Institute?
- 19+ Years of Proven Training Experience.
- Experienced Trainer – Mr. Sai Phanindra.
- 100% Practical and Interactive Training.
- Step-by-Step Technical Sessions.
- Real-Time Industry Projects.
- Hands-On Assignments and Exercises.
- Resume Guidance and Interview Preparation.
- 100% Placement Assistance.
Start Learning Snowflake Today!
Website: https://sqlschool.com/
Contact: +91 9666440801 | +91 9951440801
SQL School – Learn Today. Practice Daily. Build Your IT Career.
#Snowflake #SnowflakeTutorial #SnowflakeTraining #DataEngineering #CloudDataWarehouse #SnowflakeDataEngineering #SQL #AWS #Azure #SQLSchool
